“Building History”
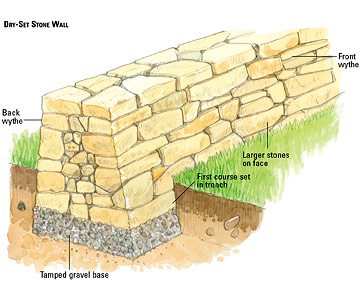
The Art of Creating a Dry-Laid Stone Wall When you build with stone, you are creating a structure that will be in place for generations to come, which makes the art of stone wall building quite satisfying. This newsletter should provide the basic knowledge to design and build a dry-laid stone wall. Preparing for the project. Once you have decided upon the location, size, and design
of the wall, it is time to remove any organic, compressible material from the base.
When all the grass, loam, roots, etc. have been removed, fill with 1 1/2″ crushed gravel and compact the area completely. If you want to ensure the wall is not affected by frost heaves, I would recommend the base be dug to 12″ then refilled and compacted. This should not be necessary unless you are constructing a very formal, crisp wall. Setting the base. I generally set the first course
about 2″ below grade using stones that have a large surface area. This will prevent settling in the future. If you are building a straight wall, set a string at either end and place each stone about 1/2″ from the string. If your wall is curved, just step back every stone or two and ensure you like the shape.
A curved wall is quite appealing and forgiving to the builder. Fill the center of the wall with 3-6″ erosion stone (rip rap). Many like the ease of filling a wall with pea stone, but you may as well build with marbles! It is just not structural.
Building the wall. Start stacking stones, ensuring that each one is solid before moving to the next stone. Use the adage “one over two” and “two over one” as you build. That is, one stone should be placed at the intersection of the two stones below and two stones should be used to cover one below. A stone wall should be built with a batter, or slope, for aesthetic appeal as well as structural integrity. If you are constructing a formal wall, then each face (exposed end) shall have the same batter. If your desire is a more rustic look, then only the overall shape shall have a batter, not each stone. Finishing the wall. Until you gain the feel and eye for shape and scale, a few tools are essential. A level and tape measure may be used to ensure you have reached
adequate height at your desired level. You may also use strings, similar to setting the base, that will guide your finished product. The level and tape measure may also be
used to determine batter. I typically use 1 1/2 – 2″ slope per foot of height. The best advise I can give is to continually step back. Don’t fret over a single stone, but ensure the overall look is to your liking. If you have further questions or comments,
please feel free to email me at rusticstoneandgarden@gmail.com.